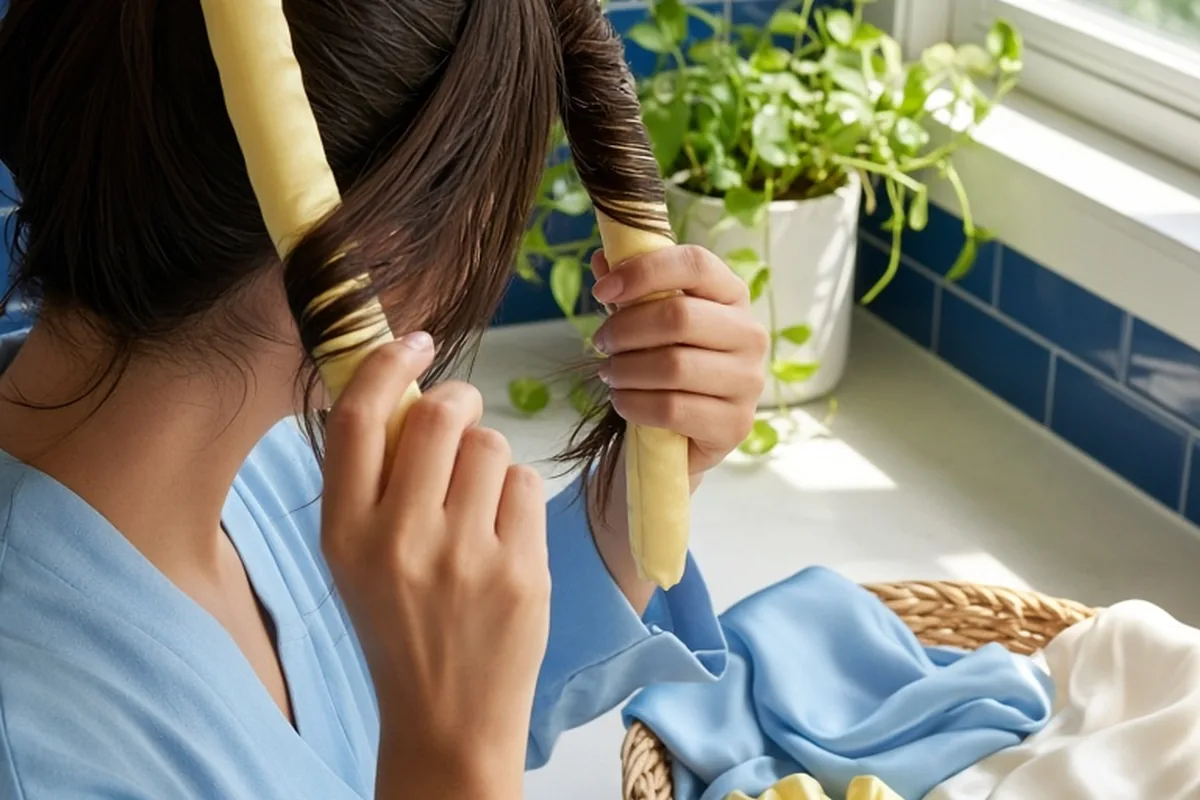
To do a heatless curls routine as a beginner, start with hair that is roughly eighty to ninety percent dry. Apply a lightweight leave-in conditioner or mousse to provide hold and hydration. Place a flexible satin curling rod, robe sash, or long socks over the crown of your head, secure the base with a clip, and wrap sections of hair tightly away from your face. Fasten the ends with silk scrunchies, sleep on the wrap, and gently unravel the sections in the morning before finishing with a light hair oil.
Switching from hot curling irons to overnight wrapping methods helps preserve hair integrity, reduce split ends, and minimize moisture loss over time. While the wrapping process requires some manual coordination at first, establishing a repeatable evening sequence ensures reliable, bouncy results without the risk of thermal damage.
Selecting the Right Heatless Curler Method for Your Hair Type
Choosing an appropriate wrapping tool depends largely on your natural hair length, density, and strand texture. Commercial satin curling ribbons and foam rods remain the most popular option for medium to long hair because smooth satin fabric reduces friction against the hair cuticle, preventing overnight frizz and tangles. For individuals with shorter layers or shoulder-length hair, standard-diameter foam rods may feel too bulky; in these cases, smaller-gauge flexi-rods, tube socks, or robe belts often provide a tighter grip and allow shorter ends to stay securely tucked throughout the night.
Your natural texture also influences how easily your hair holds a mechanical set. Fine or straight hair often requires a firmer wrap and a dedicated styling foam to maintain definition once unraveled. Conversely, naturally wavy, curly, or coarse hair already contains structural texture, which means looser wrapping techniques like French-braiding or soft ribbon wrapping will yield defined results without requiring heavy hold products. Evaluating your hair thickness and current baseline texture beforehand ensures you pick a method that balances comfort during sleep with effective curl formation.
Preparing Clean or Second-Day Hair with Proper Moisture Balance
The primary factor determining whether heatless curls succeed or fail is the moisture level of your hair before wrapping. Hair that is completely wet will not dry fully while wrapped against the scalp overnight, leading to limp, damp strands and collapsed curls by midday. On the other hand, hair that is entirely dry may not reform its hydrogen bonds around the curler, resulting in faint waves that drop out within an hour. Aim for hair that feels slightly cool to the touch and roughly eighty to ninety percent dry before you begin placing your tools.
If you are washing your hair immediately beforehand, blow-dry or air-dry it until only slight dampness remains. If you are styling second-day dry hair, lightly mist the mid-lengths and ends with a continuous water spray bottle rather than saturating the roots. Once damp, work a dime-sized to nickel-sized amount of styling mousse, setting lotion, or lightweight leave-in cream through your strands using a wide-tooth comb. This distributes styling polymers evenly, coats the strand surface to prevent flyaways, and creates the temporary flexible hold necessary for the shape to lock in as it dries.
The Beginner Step-by-Step Wrapping Routine with a Silk or Satin Ribbon
Begin by creating a clean center or preferred side part from your forehead to the nape of your neck, dividing your hair into two equal left and right halves. Place your satin curling rod horizontally across the top of your head, balancing it so equal lengths hang down on either side. Use a large claw clip at the very crown to anchor the rod firmly in place so it does not shift while you maneuver your hands around the hair sections.
Starting on one side near the front hairline, take a small section of hair about one to two inches wide. Direct this section up and over the ribbon, wrapping it tightly backward away from your face and pulling it back underneath the rod. As you prepare to make the second wrap, gather a new small section of hair from underneath and merge it into your working piece, similar to the technique used when creating a French braid. Continue this rhythm down the length of the ribbon, incorporating fresh sections from both the front and back of that side until all loose strands are joined into the wrap.
Once you reach the bottom of your hair and have no remaining loose sections to add, wrap the tail end of the hair smoothly around the remaining rod. Secure the very ends with a soft satin scrunchie to avoid creating indentations or crimps in the tips. Repeat the exact same sequence on the opposite side of your head, maintaining consistent tension so that both sides curl symmetrically. Remove the top claw clip once both sides are anchored securely.
Securing the Wrap for Restful Sleep and Minimal Morning Frizz
Sleeping with curlers requires practical positioning to ensure both physical comfort and hairstyle preservation. If left hanging loose, the two wrapped sides can easily rub against your pillowcase, loosening the scrunchies or causing friction frizz along the hairline. A practical solution is to cross the two ends behind your neck and bring them forward, tying them or clipping them securely at the crown, creating a halo shape that keeps the sides tucked close to your skull.
Side sleepers often find halo positioning significantly more comfortable because the sides of the head remain flat against the pillow. Back sleepers can alternatively leave the rods crossed loosely in front over the chest. To provide an extra layer of protection, cover the entire wrapped head with a silk bonnet or wrap a satin scarf around your perimeter. This barrier prevents your sheets from absorbing the hair's natural moisture, stops stray baby hairs from pulling free, and keeps the rods from shifting out of position as you change sleeping postures throughout the night.
Unwrapping, Separating, and Setting Your Heatless Curls for Longevity
When you wake up, verify that your hair feels completely dry and warm to the touch before removing any fasteners. If you suspect any lingering internal dampness, leave the wrap in place while you complete your morning routine, or gently direct low, cool airflow from a hair dryer over the wrapped sides for two minutes. Once dry, carefully remove the bottom scrunchies and unhook any clips anchoring the wrap at your crown.
Resist the urge to yank the rod straight out, which can cause snagging and unnecessary friction. Instead, hold the top center of the rod and pull it gently upward, allowing the spirals of hair to slide off naturally and drop down around your shoulders. At first, the curls will appear very tight, ringlet-like, and compact. Dispense two to three drops of lightweight hair oil or silicone-based serum onto your palms, rub them together to warm the product, and gently rake your fingers through the lengths to separate the coils into soft, continuous waves. Avoid using fine-tooth brushes, which can disrupt curl grouping; stick to your fingers or a wide-tooth detangling comb for a polished finish.
Troubleshooting Common Heatless Styling Problems and Uneven Results
If you encounter uneven curls or sections that fall flat quickly, small adjustments to your technique will resolve most issues. The most frequent beginner complaint is straight or frizzy ends. This typically occurs when the final inches of hair slip loose from the scrunchie or are wrapped with inconsistent tension. To remedy this, fold the ends of your hair smoothly over the bottom of the rod and double-loop a smaller satin scrunchie directly over the tips, ensuring the ends remain flush against the satin surface.
Another common challenge is asymmetric curl patterns, where one side turns out tighter or more defined than the other. This usually stems from wrapping with tighter tension or taking smaller sections on your dominant hand side. Focus on keeping section sizes identical on both halves and check your progress in a mirror before heading to bed. If the back of your head displays a noticeable gap where the hair parted, ensure you are angling your incorporated sections slightly toward the back of the rod rather than pulling everything purely downward toward your ears.
Frequently asked questions
Can I do a heatless curls routine on soaking wet hair?
No, wrapping soaking wet hair tightly prevents airflow, leaving the inner strands damp in the morning and causing the curls to collapse immediately. Always dry your hair until it is roughly eighty to ninety percent dry before wrapping for optimal shape retention.
How long do heatless curls need to stay in place to set?
A standard set generally requires four to six hours if your hair starts lightly damp and dries completely during that period. Leaving the wrap in overnight while you sleep provides the most reliable timeline for long-lasting definition.
What products help fine hair hold heatless curls longer?
Fine hair benefits from applying a lightweight styling mousse or setting spray to damp strands before wrapping. After taking the curls down in the morning, a light mist of flexible-hold hairspray or texturizing spray prevents the waves from drooping throughout the day.
Will heatless curling rods damage my hairline or scalp?
When installed with comfortable tension, satin heatless rods do not damage hair or pull at the scalp. Avoid pulling sections excessively tight at the root, and use soft scrunchies to eliminate mechanical tension along your hairline.
Your next step
Assess your current hair dampness, apply a small amount of lightweight styling mousse, and complete your first satin ribbon wrap tonight before heading to bed.