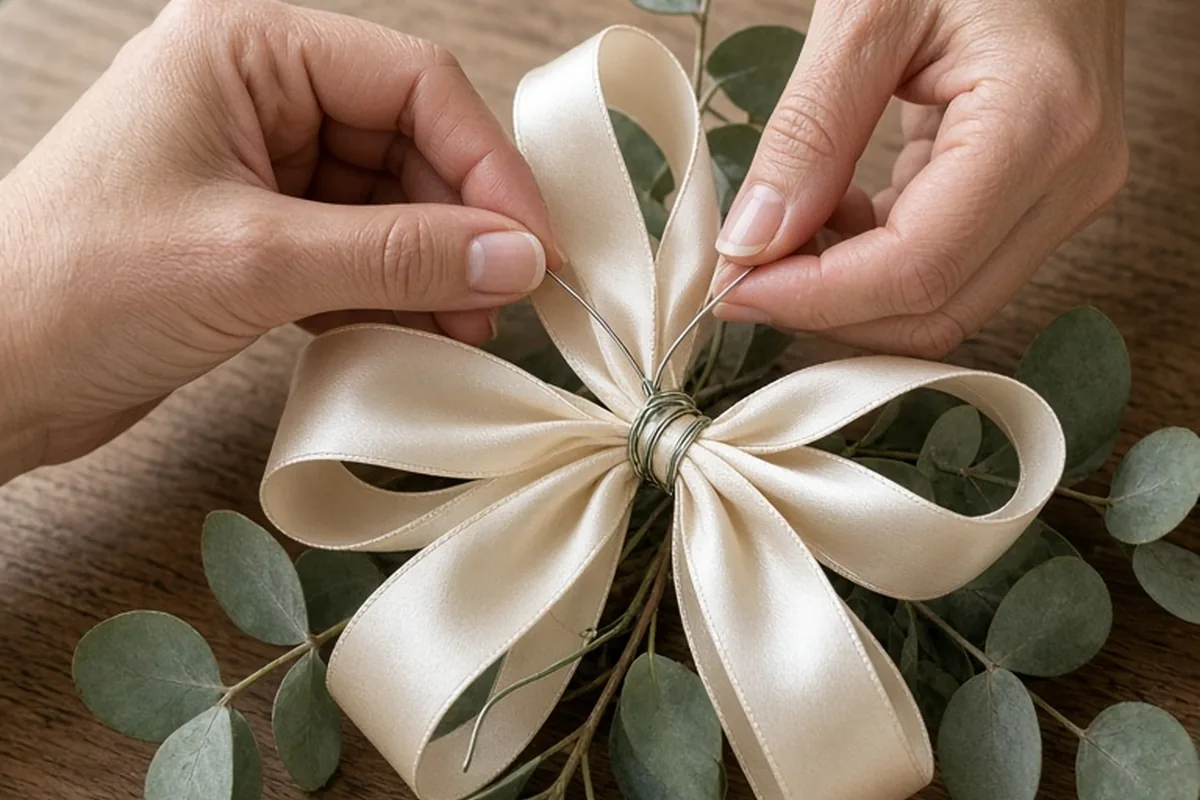
To make DIY wedding bows, select high-grade wired ribbon for structured pew markers or flowing chiffon for organic drape. Measure ribbon lengths based on desired loop diameter and tail drop, fold consecutive figure-eight loops while pinching the center tightly, and cinch the middle with 26-gauge floral wire or chenille stems. Finish by wrapping a decorative center band, cutting clean swallowtail ends, and fluffing loops outward from back to front before attaching them to venue surfaces.
Handcrafting decorative bows offers couples complete creative control over their ceremony aisle, reception chairs, welcome signage, and floral arrangements while managing decor expenses effectively.
Selecting Ribbon Fabrics and Textures for DIY Wedding Bows
Choosing the appropriate ribbon material establishes the overall mood of ceremony decor and determines how easily a bow holds its shape throughout a long event day. Wired edge ribbon represents the most forgiving choice for beginners because the thin internal wire keeps loops buoyant, prevents flattening during transport, and permits rapid reshuffling if a loop gets crushed during setup. Wired satins, dupioni silks, and structured linens excel in traditional indoor sanctuaries or formal ballroom spaces where clean geometry, crisp volume, and symmetrical presentation are desired.
Unwired ribbons such as raw-edge chiffon, habotai silk, and loose-weave cotton gauze create a romantic, relaxed aesthetic characterized by fluid drape and organic movement. Because unwired fabrics cannot maintain hollow structural loops on their own, they work best when formed into loose French knots, cascading shoestring ties, or multi-streamer bundles attached to floral foam or greenery swags. Mixing textures within a single bow, such as pairing a wide 2.5-inch wired satin foundation with a narrower overlay of sheer organza or soft velvet, adds visual depth and luxurious contrast without requiring complicated knotting techniques.
Ribbon width directly dictates the visual scale and viewing distance of your finished project. Narrow ribbons under one inch wide easily disappear when viewed from more than a few feet away, making them better suited for bouquet stems, favor boxes, and program booklets. For church pew ends, banquet chair backs, and ceremony arch installations, select ribbon widths between 1.5 inches and 4 inches. Wider foundations ensure that your handiwork remains distinct and photogenic across wide ceremony aisles and large reception halls.
Mastering the Wire-Bound Multi-Loop Technique
The wire-bound multi-loop bow serves as the foundational design for traditional wedding aisle decor, arbor swags, and decorative wreaths. Rather than tying a standard over-under knot that distorts fabric and creates uneven tension, this method relies on gathering continuous folds around a central anchor point before securing everything with flexible wire. Begin by cutting a generous tail length if you want cascading streamers, or work directly from a spool to minimize fabric waste during initial loop formation.
Hold the ribbon between your thumb and index finger roughly six to eight inches from the cut end. Create your first upper loop by bringing the ribbon up, curving it downward, and pinching it tightly against the center anchor point. Twist the ribbon 180 degrees at the pinch point so that the right side of the fabric consistently faces outward, then form a matching bottom loop on the opposite side. Continue folding symmetrical pairs of loops, gradually expanding their diameter by half an inch per layer if creating a stepped, spherical bow, or keeping them uniform for a dense pomander effect.
Once you have gathered six to ten total loops in your grip, wrap a 12-inch length of 26-gauge floral wire or a color-matched chenille stem around the compressed center fold. Pull the wire firmly toward the back of the bow and twist the ends tightly against the base three to four times using craft pliers or firm finger pressure. Cut a short separate strip of ribbon, fold it into thirds lengthwise to hide raw edges, and glue or tie it over the exposed wire center before using your fingers to gently pull and spread the inner loops outward into an open, three-dimensional dome.
Constructing Modern Cascading and French Bows
Modern wedding aesthetics frequently favor relaxed, editorial silhouettes featuring exaggerated streamers and understated central loops over tight spherical designs. The French bow construction emphasizes wide, gentle horizontal loops with long, flowing tails that flutter naturally in light breezes. To create this look, form two simple horizontal loops that span eight to ten inches across, cross them loosely over a central gathering point, and cinch the waist with narrow floral wire or a tight hand-knot rather than bulky internal wiring.
Cascading streamers can be cut in varied graduated lengths ranging from eighteen inches to floor-skimming three-foot drops. To assemble high-impact streamer bundles, cut four to six separate ribbon strips in varying complementary textures, fold them across their midpoints, and wire the clustered middles directly behind the primary bow knot. This layering creates a cascading waterfall effect that looks striking against wooden church pews, rustic arbor beams, or acrylic welcome signs.
Finishing the tail ends properly prevents fraying and delivers a polished, professional presentation. For synthetic materials like polyester satin and nylon organza, cut the ends at a sharp 45-degree diagonal angle or fold the tail lengthwise and snip diagonally outward to create a classic swallowtail chevron. Running a clear fabric sealant or briefly passing the very edge near a controlled flame seals synthetic threads immediately, while natural silk and linen ribbons are best trimmed with ultra-sharp fabric shears and left with a clean raw edge.
Attaching Bows Securely Without Damaging Venue Surfaces
Every wedding venue maintains specific preservation rules regarding fasteners, especially historic churches, protected heritage properties, and rented banquet chairs. Standard household adhesives, nails, and staples cause irreversible surface damage and are almost universally prohibited. Before assembling attachment mechanisms, consult your venue coordinator to verify permitted fastening methods for pews, chairs, railings, and stone pillars.
For wooden church pews, specialized plastic pew clips slip over the top cap of the bench without scratching varnished finishes or requiring sticky residues. These clips feature an integrated front hook or eyelet where you can twist your bow’s rear floral wire directly into place. If pew ends feature irregular molding or heavy carvings that cannot accommodate standard clips, use wide elastic bands or soft velvet ribbons tied in a simple loop around the bench end to serve as a non-marking anchor point for your decorative bow.
For Chiavari chairs, folding wood seats, and reception railings, flexible clear cable ties, soft chenille pipe cleaners, or removable micro-suction hooks provide robust anchoring that resists movement as guests take their seats. Outdoor garden settings require heavier stabilization because crosswinds can easily flip lightweight bows upside down; anchoring bows to structural greenery with two points of contact—one at the center wire and one lower down along the tail bundle—prevents unwanted twisting.
Calculating Ribbon Yardage and Managing Batch Assembly
Accurate yardage estimation prevents mid-project fabric shortages and color dye-lot mismatches between separate ribbon spools. A standard medium-sized pew bow with six five-inch loops, a center knot, and two 24-inch hanging tails requires approximately four to five yards of ribbon. Oversized statement bows with eight to ten loops and floor-length cascading streamers can require seven to nine yards per unit. To determine exact requirements, build one complete prototype using your chosen ribbon width, untie and measure the consumed length, and multiply by your total venue count while adding a ten to fifteen percent buffer for trimming adjustments and accidental cutting mistakes.
Streamlining your workflow through assembly-line batching significantly reduces the physical fatigue and time commitment of handcrafting dozens of matching pieces. Rather than crafting one complete bow from start to finish repeatedly, break the project into sequential stages: measure and cut all streamer lengths in a single session, precut and prepare binding wires, and organize floral greenery sprigs into uniform bundles.
Set up an ergonomic workstation with sharp fabric shears, measuring rulers taped directly to the tabletop surface, and collection bins organized by component. Work in focused intervals to maintain consistent hand tension; tired fingers tend to pinch centers more loosely, resulting in inconsistent loop volumes between the first bow created and the last. Enlisting helper hands to manage tail cutting, wire twisting, or final end sealing allows the primary crafter to focus on consistent loop sizing.
Transporting, Storing, and Fluffing Bows on the Wedding Day
Proper post-assembly storage ensures that your handcrafted bows arrive at the venue in pristine, ready-to-display condition. Never store completed bows in plastic bags or deep bins where their weight can crush bottom layers. Instead, use shallow cardboard storage boxes or wide plastic storage totes lined with clean, acid-free tissue paper. Place bows in single layers or separate stacked tiers using rigid cardboard dividers, loosely stuffing loops of delicate wired ribbons with crinkled tissue puffs to preserve internal volume.
Transport storage containers flat in a temperature-controlled vehicle rather than a hot trunk, as high humidity and excessive heat can soften ribbon sizing, loosen hot-melt adhesive joints, and cause satin to develop stubborn wrinkles. Prepare a mobile day-of touch-up kit containing spare ribbon spools, wire cutters, extra floral wire, clear zip ties, glue dots, and a portable handheld garment steamer to resolve unexpected on-site issues.
On the morning of the ceremony, assign a trusted member of your decor team to perform a final inspection and fluffing pass after all bows are anchored. Fluffing involves inserting your fingers deep into each loop to expand its curve, separating overlapping ribbon layers, aligning center wraps, and gently running two fingers down each streamer to encourage smooth, graceful drape. This final tactile adjustment removes any minor travel creasing and ensures uniform visual rhythm along the entire ceremony aisle.
Illustrative Scenarios
Illustrative Production Plan for a 20-Pew Ceremony Setup
A couple planning a traditional chapel ceremony needed twenty uniform pew bows featuring soft ivory wired satin and cascading eucalyptus accents. Rather than buying pre-made retail assemblies, they calculated their needs using a single prototype requiring 4.5 yards of 2.5-inch ribbon per pew, purchasing 100 total yards across four 25-yard spools to maintain dye consistency. Working across two evening sessions, they cut all ribbon streamers, bundled dried eucalyptus stems with floral tape, and wire-cinched the multi-loop bow toppers. Finished pieces were stored in shallow, tissue-lined sweater boxes and transported flat on the morning of the event.
Key point: Testing a single prototype before purchasing bulk spools ensures accurate yardage calculations, while batching individual assembly steps keeps bow dimensions uniform across all ceremony seats.
Frequently asked questions
How much ribbon is needed for an average wedding pew bow?
A standard wedding pew bow with six to eight medium loops and two-foot tails typically requires between four and five yards of ribbon. If you plan to add floor-length cascading streamers or extra layers of sheer fabric, plan for six to eight yards per piece.
What is the easiest ribbon for beginners to shape?
Wired ribbon made of polyester satin, grosgrain, or medium-weight linen is the easiest material for beginners. The internal structural wire allows you to shape, adjust, and re-fluff loops easily without the fabric collapsing under its own weight.
How far in advance can DIY wedding bows be made?
You can craft wire-bound ribbon bows several months in advance as long as you store them flat in shallow, clean boxes protected from humidity, sunlight, and heavy weight. If your bows incorporate fresh greenery or live floral stems, construct the ribbon bases ahead of time and wire the fresh accents in place within twenty-four hours of the ceremony.
How do you attach bows to church pews without leaving marks?
Use clear plastic commercial pew clips lined with felt pads, which clamp over bench ends without scratching wood finishes or using adhesive. Alternatively, loop wide soft velvet or elastic ribbon around the pew end and wire the bow directly to the fabric band.
Your next step
Build a single sample bow with your chosen ribbon width and calculate the exact yardage used before purchasing bulk spools for your entire ceremony space.