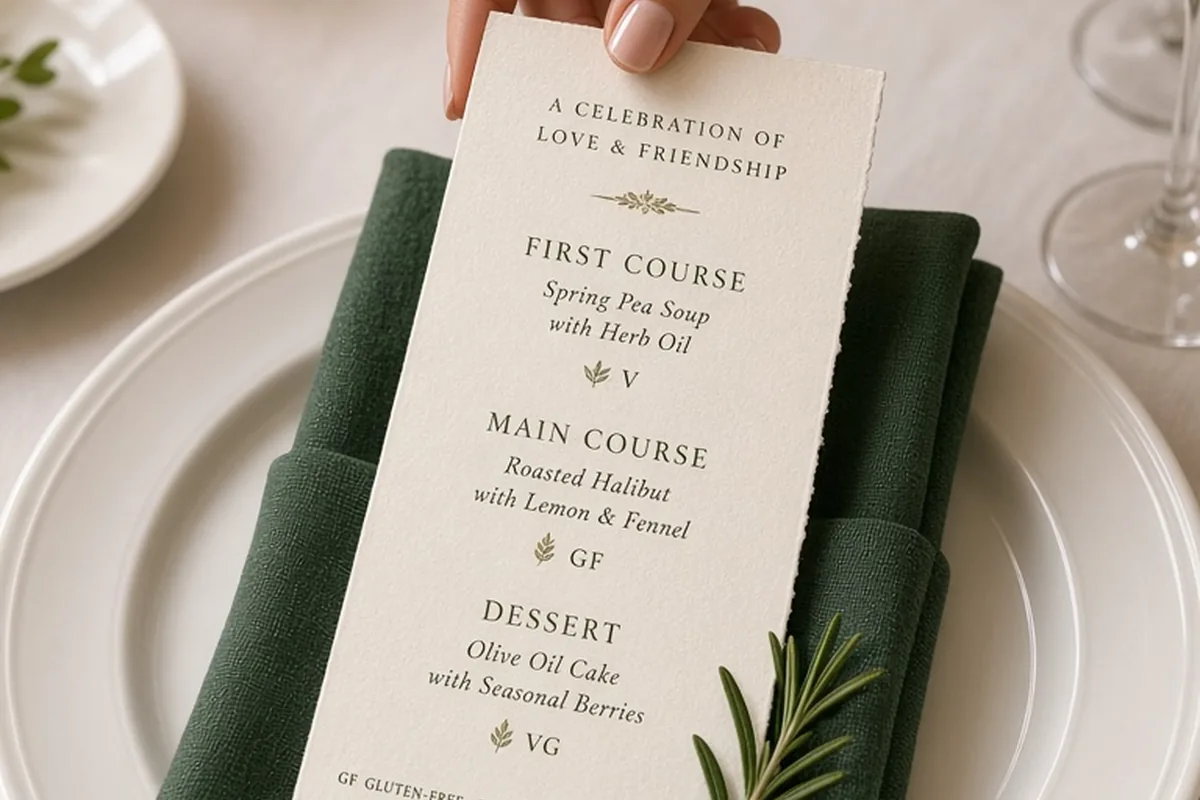
To create wedding menus with free printable templates, select a design platform like Canva or a downloadable stationery template that matches your aesthetic. Choose standard dimensions such as 4x9 inches for individual place settings or 5x7 inches for table displays. Customize the typography, course descriptions, and dietary indicators, then export the file as a 300 DPI print-ready PDF with crop marks. Finally, print on 80-pound to 120-pound cardstock using an inkjet printer or a local commercial print shop.
Printed menus elevate a wedding reception table while helping guests anticipate courses, understand culinary pairings, and identify ingredients that suit their dietary needs. Designing your own menus using free digital templates offers complete creative control while saving a significant portion of your stationery budget.
Selecting the Right Wedding Menu Format for Your Meal Service Style
The layout and quantity of your wedding menus depend primarily on whether your reception serves a plated dinner, a buffet, family-style platters, or interactive food stations. For a traditional plated dinner, individual menu cards placed at every seat create a formal, curated atmosphere. Standard individual dimensions typically measure 4 by 9 inches (often called a tea-length or tall menu) or 5 by 7 inches. The 4 by 9 format fits neatly inside folded cloth napkins or on top of narrow salad plates without overcrowding the table setting.
For buffet or family-style dining, printing an individual card for every guest is often unnecessary and can clutter the tablescape. Instead, consider printing two to three freestanding 5 by 7 inch menus per table, secured in wooden, acrylic, or brass card holders. Alternatively, you can place a single larger menu card at the head of a buffet line or next to individual food stations. This structure guides guest traffic smoothly, keeps your printing workload manageable, and reduces paper waste while ensuring everyone knows the available culinary options.
Finding and Customizing Quality Free Printable Wedding Menu Templates
Free printable menu templates are widely accessible through graphic design platforms such as Canva, downloadable stationery blogs, and online invitation suites. When browsing template libraries, search for minimalist, classic, or botanical designs that provide a strong typographic foundation rather than heavy background graphics. Templates with clean grids, generous white space, and modular text boxes allow you to add or remove courses without disrupting the overall layout balance.
Once you open a template in your chosen editor, replace the placeholder text with your confirmed catering menu. Keep the visual hierarchy simple by limiting your design to two complementary typefaces: one display font for headings and one clean, highly legible font for dish descriptions. Ensure that your text boxes align symmetrically with the page edges, maintaining at least a 0.5-inch margin on all sides. This protective boundary prevents text from being clipped during the trimming process and gives the finished card an elegant, intentional frame.
Typography, Hierarchy, and Readability Rules for Dinner Cards
Reception venues often feature dim, ambient lighting designed to create a romantic mood, which can make fine print difficult to read. Prioritizing typographic clarity ensures your guests can comfortably read course descriptions without straining. Set course titles—such as Appetizer, Entree, and Dessert—between 12 and 16 points in uppercase or an elegant serif font. Dish titles should sit between 11 and 13 points, while ingredient details, side pairings, and wine notes should remain at 9 to 10.5 points.
Avoid using intricate calligraphy or script fonts for multi-line dish descriptions, as script quickly becomes illegible at smaller point sizes. Reserve decorative script exclusively for short header accents, such as the word Menu or the couple's names and wedding date. Maintain high contrast between your typography and paper color. Charcoal, deep navy, or rich black ink on crisp white, cream, or warm beige paper delivers reliable readability, whereas pale gold, light gray, or pastel text often vanishes under evening candlelight.
Writing Clear Course Descriptions and Managing Dietary Callouts
A well-written wedding menu balances descriptive, appetizing language with functional clarity. Focus on the core protein or produce, preparation style, and accompanying sauces rather than listing every minor culinary component. For instance, 'Pan-seared Atlantic salmon with lemon-herb emulsion, roasted fingerling potatoes, and charred asparagus' communicates both the substance and flavor profile without overwhelming the card with excessive text.
Dietary labeling is an essential component of modern wedding stationery. If you are serving a fixed menu with multiple dietary alternatives, include small, tasteful abbreviations or icons at the end of each relevant dish description, such as GF for gluten-free, V for vegetarian, VG for vegan, and DF for dairy-free. Alternatively, add a brief note at the bottom of the card stating that vegetarian, vegan, and allergy-sensitive options are available upon request to your service staff. This approach reassures guests with restrictions while maintaining a clean aesthetic.
Paper Selection, Cardstock Weights, and Textures for Home and Commercial Printing
The tactile quality of your paper directly influences how premium your finished menus feel in your guests' hands. Standard copy paper (20 lb to 24 lb) is far too flimsy for menu cards. For a polished result, choose cardstock weighing between 80 lb cover (approximately 216 gsm) and 120 lb cover (approximately 325 gsm). An 80 lb to 100 lb cardstock passes smoothly through most home inkjet printers, while heavier 110 lb to 130 lb stocks provide a sturdy, luxurious weight best suited for heavy-duty rear-feed trays or commercial digital presses.
Consider the paper finish and texture carefully in relation to your printing method. Smooth matte cardstock produces crisp text and sharp lines without distracting glare under reception lights. Linen or felt-finish papers add subtle woven texture that complements vintage or rustic aesthetics, but heavily textured papers can cause tiny ink breaks on fine-line fonts. Cotton rag paper with natural deckled edges offers an artisanal, handmade appeal; if you choose deckled edges, print the text first on standard sheets and tear along a water-pen guide, or print directly on pre-cut artisanal paper using a straight-pass printer tray.
Print Setup, Bleed Margins, and Precision Cutting at Home
To achieve professional results when printing at home, configure your export settings correctly before hitting print. Export your finalized menu template from your editing software as a high-resolution PDF (300 DPI) rather than a JPEG or PNG image. If your design includes background colors or floral elements that extend to the edge of the paper, enable a 0.125-inch (3 mm) bleed margin and crop marks. The bleed ensures that slight shifts during cutting do not leave unprinted white slivers along the card edges.
When trimming multiple cards from standard 8.5 by 11 inch letter sheets, avoid household scissors, which produce uneven lines. Instead, use a rotary trimmer or a heavy guillotine paper cutter paired with a self-healing cutting mat and a non-slip metal ruler. Trim no more than two to three sheets at a time to prevent the blade from pulling or distorting the bottom pages. Always print a single test sheet on plain paper first to verify spelling, layout alignment, and margins before running your entire batch of cardstock.
Styling and Tabletop Presentation Ideas to Match Your Reception Decor
The way you display your printed menus contributes to the overall visual texture of your reception tables. Tucking a tall 4 by 9 inch menu card into a vertically folded cloth napkin creates a clean, architectural line on the charger plate. Alternatively, lay the menu flat across the center of the dinner plate, topped with a sprig of fresh greenery, a dried botanical stem, or a personalized place card calligraphy tag attached with a small brass paperclip.
For couples seeking an elevated, multi-layered look, combine your printed menu with tactile embellishments. Fasten a translucent vellum overlay printed with a welcome message on top of the main menu card using a drop of wax seal or a delicate silk chiffon ribbon. If your reception features communal wooden farm tables without formal chargers, propping your menus in minimal slotted beechwood or brushed gold holders keeps the surface organized while making the menu readily visible from any angle.
Illustrative Scenarios
Stationery Budget Optimization for a 120-Guest Plated Dinner
A couple planning an evening dinner for 120 guests chose a tall 3.75 by 8.5 inch printable template to fit two cards per letter-sized sheet. They customized the font hierarchy for dim reception lighting, exported a 300 DPI PDF with trim marks, and printed 65 sheets on 100 lb matte white cardstock using a local print shop. They trimmed the cards using a rotary cutter and tucked each menu into a forest green linen napkin with a sprig of rosemary.
Key point: Formatting templates to fit two cards per standard sheet cut paper costs by half, while testing contrast under low lighting ensured the menus remained easy to read throughout dinner service.
Frequently asked questions
How many wedding menus should I print?
For plated dinners with individual place settings, print one menu per guest plus a 10 to 15 percent buffer for last-minute additions, keepsakes, and accidental spills. For buffet or station-style dining, print two to three menus per table to place in tabletop holders, along with one display menu at each food station.
Can I print wedding menus on a regular home inkjet printer?
Yes, standard desktop inkjet printers can handle cardstock up to 80 lb or 90 lb cover weight without jamming. If you use cardstock heavier than 100 lb, check that your printer has a manual rear-feed slot with a straight paper path to prevent paper curl and roller marks.
When should I finalize and print the wedding menus?
Print your menus two to three weeks before the wedding day, after all guest RSVPs and specific dietary requirements have been collected and your caterer has locked in the final ingredient list. Printing earlier risks needing last-minute reprints if catering components change.
What is the most cost-effective size for printable wedding menus?
A 4 by 9 inch or 3.75 by 8.5 inch dimension is the most economical format because you can fit two individual cards on a single standard 8.5 by 11 inch sheet of paper. This layout reduces total paper consumption by 50 percent compared to printing 5 by 7 inch cards.
Your next step
Download a clean 4 by 9 inch printable menu template, insert your confirmed catering text with dietary callouts, and run a single test print on 100 lb cardstock to evaluate legibility under evening lighting.