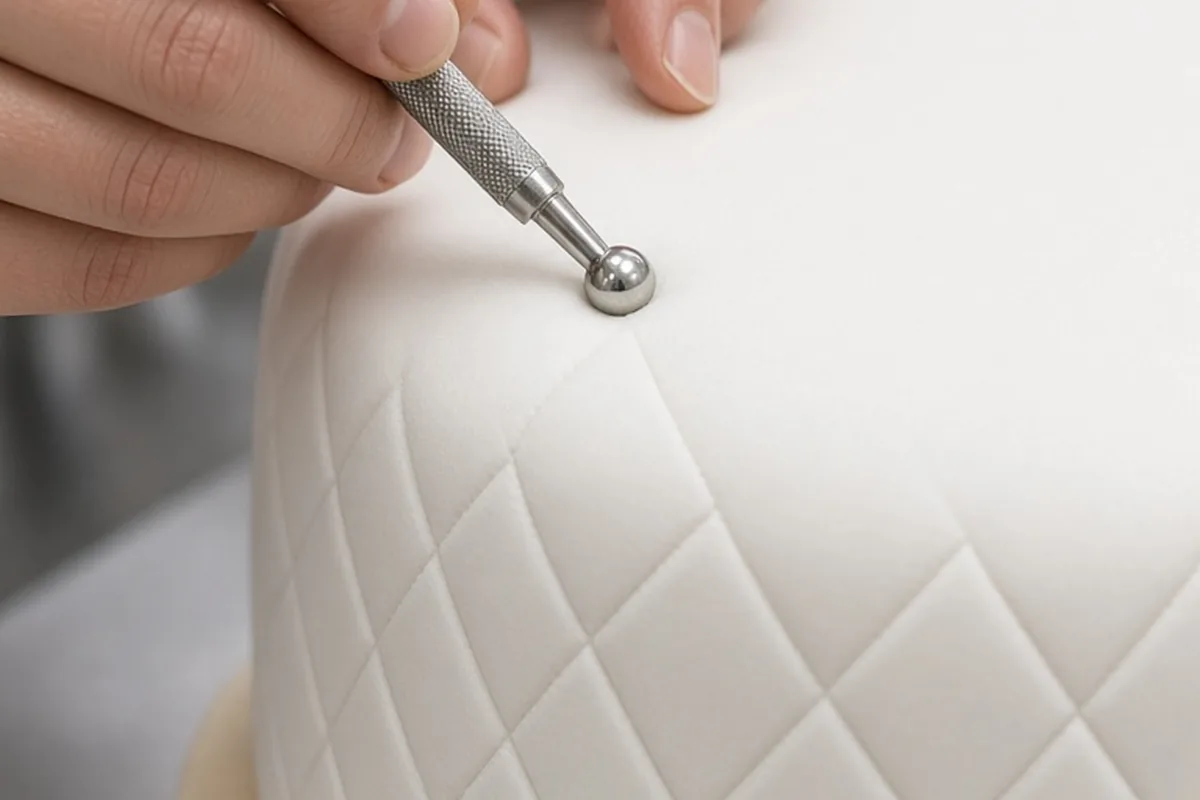
Mastering a quilted wedding cake design requires precise geometric spacing, the correct covering medium, and careful timing. Bakers typically achieve this classic tufted look by chilling a firm fondant or crusted buttercream tier, marking an evenly spaced diamond grid using an embossing mat or flexible ruler, and pressing small dragees, sugar pearls, or royal icing dots into each intersection. Flawless execution depends on calculating tier circumference so diamond points align seamlessly around the back.
The quilted or tufted pattern remains one of the most requested textures in wedding cake design, evoking vintage upholstery, luxury leather goods, and timeless couture gowns. While the finished look appears effortless, transferring a flat diamond pattern onto a three-dimensional cylinder demands strict geometric planning and physical dexterity.
Selecting Between Fondant, Crusted Buttercream, and Ganache
The medium you choose to coat your cake tiers determines your working window and the crispness of your quilted impressions. Rolled fondant applied over a firm foundation of white chocolate ganache offers the most reliable, clean canvas for deep tufting. Fondant provides structural elasticity, meaning it can take deep diagonal indentations without tearing or exposing the underlying cake crumb. However, commercial fondants vary in stretch and drying speed. A formulation with moderate elasticity and a touch of vegetable shortening or tylose works best, preventing the paste from drying out before you finish wrapping the tier and embossing your pattern.
Crusted buttercream presents an appealing alternative for clients who dislike the texture or taste of sugar paste, but it requires precise timing. Standard Swiss meringue buttercream will not hold a molded quilt line unless the entire tier is frozen solid, and even then, condensation during thawing will blur soft details. Crusting buttercreams—typically American-style recipes formulated with an appropriate ratio of butter, shortening, and powdered sugar—form an outer delicate skin while keeping the cake interior tender. You must emboss this skin the moment it resists a gentle finger tap without sticking, usually ten to twenty minutes after smoothing, because waiting longer causes the dry crust to crack under tool pressure.
Calculating Tier Geometry for Quilted Wedding Cake Tiers
A common flaw in handmade quilted tiers is the awkward partial diamond or mismatched seam where the pattern finishes at the back. To eliminate this issue, treat the cake tier as an unrolled rectangle whose length equals its circumference. Calculate circumference by multiplying the tier diameter by 3.14159. For instance, a six-inch round tier has an approximate circumference of 18.85 inches, while an eight-inch tier measures roughly 25.13 inches. If your diamond embossing tool or cutter produces diamonds that are two inches wide from left point to right point, an eight-inch tier will fit twelve and a half diamonds, leaving an uneven, truncated gap at the rear.
To achieve a seamless join, adjust either the diamond width or the spacing increments before making permanent marks on the cake. Wrap a clean strip of parchment paper or a flexible dressmaker tape around the freshly covered, chilled tier to capture the exact exterior perimeter, which will be slightly larger than the pan size once frosting and coverings are applied. Fold this paper strip in half repeatedly or use a ruler to divide the strip into equal intervals that closely match your target diamond width. Transfer these tick marks to the base of the cake using a scribe tool or needle pin, establishing verified guideposts that keep your diagonal lines evenly pitched from start to finish.
Choosing Between Embossing Mats and Freehand Rulers
Commercial quilting tools fall into two main categories: full-coverage impression mats and manual marking tools like diamond cutters or flexible quilting rulers. Acrylic and silicone impression mats offer rapid coverage because they stamp dozens of diamonds simultaneously. Acrylic mats provide exceptionally sharp, uniform edges, but their rigidity creates problems when pressing against curved tier walls, especially near top and bottom edges where the tool can rock and leave unsightly linear gouges. Flexible silicone mats contour naturally around cylinders, yet they require uniform hand pressure across the entire sheet; pressing harder with your fingertips than your palm results in uneven impression depths across the cake.
Manual methods using a flexible drafting ruler, a diamond-shaped cookie cutter, or a rotating stitch wheel require more time but deliver superior precision on tall or custom-proportioned tiers. A quilter's wheel running along an angled acrylic guide creates delicate, realistic stitch perforations that mimic tailored fabric. Manual layout also allows you to adjust the diamond pitch dynamically if working with tapered or hexagonal tiers. When using a handheld diamond cutter, gently rest the bottom point against your base reference mark, press just enough to define the outline without slicing through the medium, and use each completed diamond edge as the alignment shelf for the subsequent impression.
Timing the Indentation and Controlling Tool Friction
Achieving crisp, cushioned tufts depends heavily on surface resistance and environmental temperature. If you press into freshly draped fondant while it remains warm and soft, the medium drags along with the tool, producing sloppy tears and distorting the cake's cylindrical shape. Conversely, chilling a fondant-covered tier in the refrigerator makes the paste firm, but as soon as it meets warm room air, moisture condenses on the surface. Embossing over this sticky condensation will cause plastic mats to weld to the sugar paste, pulling away large chunks of covering when peeled back.
The ideal window occurs when the fondant has settled over a chilled ganache undercoat and its surface is dry to the touch, with the cake core remaining firm enough to withstand inward pressure without bowing. Dust your impression mat or ruler lightly with cornstarch or powdered sugar, tapping away all excess powder to prevent cloudy buildup inside the diamond recesses. Alternatively, rub a translucent film of solid vegetable shortening across the embossing grid to ensure clean tool release without leaving chalky residues. Press with a flat cake smoother placed over the back of the mat rather than bare fingers to distribute the force evenly across the tier face.
Attaching Pearls, Dragees, and Piped Intersections
The visual weight of a quilted pattern concentrates at the grid intersections, where diamond points meet to create the illusion of deep, buttoned cushions. Decorators traditionally finish these points with edible sugar pearls, metallic dragees, royal icing dots, or miniature sugar blossoms. To create a recessed cushion effect, use a small ball tool to press a subtle depression into each diamond corner immediately after embossing. This small divot serves two purposes: it enhances the three-dimensional shadow of the tufting and provides a secure physical pocket that keeps round pearls from slipping down the vertical tier wall.
Selecting the correct adhesive is vital to ensure embellishments remain secure during transit and display. Edible glue made from carboxymethyl cellulose (CMC) or tylose powder dissolved in water provides a secure bond for lightweight sugar pearls, provided you apply it sparingly with a fine-tipped paintbrush. Excess liquid dissolves the pearl coating and creates sticky, shiny streaks down the matte cake surface. For heavier metallic dragees or chocolate beads, pipe a tiny dot of stiff royal icing or melted cocoa butter directly into the recess before setting the accent with food-safe craft tweezers or a silicone-tipped pearl applicator tool.
Managing Ambient Humidity and Temperature Fluctuations
Quilted cakes are uniquely vulnerable to humidity because surface indentations naturally collect and pool moisture. When sugar paste absorbs ambient water vapor, the crisp edges of diamond impressions soften, causing the distinct tufting lines to flatten over several hours. Metallic dragees containing sugar coatings or silver leaf can also tarnish, dissolve, or bleed colored dye across the white tier if exposed to persistent dampness. If you must decorate in a humid climate, work in a dedicated air-conditioned room where relative humidity stays below fifty percent.
Refrigeration logistics require deliberate care during warm wedding seasons. When taking a completed quilted cake out of cold storage, condensation inevitably forms as warm air hits the cold tier. Avoid touching, dusting, or adjusting pearls while this moisture layer is active; touching sweating fondant creates permanent shiny blemishes and dislodges decorations. Allow the tier to acclimatize undisturbed inside a closed corrugated cardboard cake box in an air-conditioned room. The cardboard box absorbs the exterior moisture, allowing the cake temperature to rise gradually to ambient levels without sweating onto the embossed relief.
Correcting Misaligned Seams and Surface Blemishes
Even seasoned cake artists occasionally encounter miscalculated grid intervals or accidental thumb marks during tier assembly. When your diamond pattern does not align perfectly at the back seam, do not attempt to smooth out and re-emboss that single vertical strip, as reworked fondant stretches and develops an uneven, leathery texture. Instead, design around the flaw. Designate the uneven junction as the definitive back of the cake, or plan your floral arrangements so that an organic cascade of sugar foliage, fresh blooms, or wafer paper details naturally covers the seam.
For small tears or dragging flaws along individual grid lines, spot repair is possible using high-proof clear alcohol and a tiny amount of matching fondant paste. Mix a pea-sized piece of sugar paste with a drop of cooled boiled water or grain alcohol until it forms a smooth slurry. Using an artist detail brush, paint the slurry into shallow tears, allow the alcohol to evaporate, and gently restore the indentation using a veining tool or the dull edge of an angled palette knife. A delicate dusting of cornstarch buffed over the repaired zone with a dry, soft makeup brush restores the original matte finish without leaving visible witness marks.
Frequently asked questions
Can I quilt a cake covered in soft Swiss meringue buttercream?
Traditional embossing mats do not work well on Swiss meringue buttercream because it contains significant fat and does not form an outer crust. You can achieve subtle quilting by freezing the frosted tier until rock hard, quickly scoring shallow lines with a warm ruler and palette knife, and returning it to the refrigerator immediately. Most decorators, however, prefer using crusted American buttercream or rolled fondant over ganache for clean, reliable tufting.
How deep should diamond impressions be on a fondant cake?
Diamond impressions should penetrate roughly one-third to one-half the thickness of your fondant layer, typically around one to two millimeters. Pressing deeper risks cutting completely through the sugar paste and exposing the cake or crumb coat beneath. Pressing too shallowly results in faint lines that disappear under banquet hall lighting or vanish once sugar pearls are attached.
What is the best way to keep dragees from falling off the cake during delivery?
Always press a slight indentation into each intersection using a small round ball tool before attaching the bead. This pocket provides mechanical support alongside your adhesive. Secure the dragees with a tiny dot of stiff royal icing rather than piping gel or water, as royal icing sets rock-hard and will not soften under road vibration.
How do I prevent impression mats from sticking to the cake surface?
Ensure the cake surface is completely dry to the touch before pressing the mat against it. Lightly dust the mat with cornstarch, knocking off any excess, or apply a micro-thin layer of vegetable shortening across the plastic. Never press an impression mat onto a cold cake that has begun sweating from room condensation.
Your next step
Measure your cake tier's exact circumference using a parchment strip and divide it into equal intervals before embossing to ensure your diamond pattern meets cleanly at the back.